Archive

Food

So rather than working up to a huge post on pizza, I thought I would jolt down a few thoughts I had about about the subject.

  • While I have spent a lot of time trying to perfect my dough recipe, I have found out that the cooking process makes a much bigger difference.
  • Dough can make a tasty pizza amazing though, and an a good pizza fall flat.
  • It is fun how you can make sauce on a pizza a strong support for the flavor pallet of a dish but then switch a few things and have it be a prime player.
  • People love it when you make a pizza for them, even if it comes out meh.
  • Spicy honey on pizza? Fucking delicious.

Hey look at that! Topics for future posts.

So today’s food adventure is how to roast the hearts of your enemies for your loved ones.

I HUNGER

From the heart, I HUNGER FOR YOU

What, you don’t roast the hearts of your enemies? What the hell do you do with them? You do WHAT? Ew. Well what about pizza? We can work hearts into that. That is almost the same thing. Right? Good! Lets get started.

Dough

Now if any of you know me well, you know that I have been laboring over perfecting a dough recipe for pizza. I have tried a few variants and this has been my favorite one so far.

  • 16 oz bread flour
  • 2 packets of rapid rise yeast
  • 1 tbsp salt
  • 10 oz warm water (I like 110°, but that is just me)
  • 1 tbsp malted barley syrup
  • 2 tbsp olive oil

This dough makes enough for 2 14″ pizza for you and your main squeeze. It rolls out very easily, but still is fluffy when rolled out thin and cooked in a hot oven. It also has a really rich, bready flavor without having to rise for days on end. You can thank your malted barley syrup (Mmmm, beer leftovers). If you want to have a have a thicker crust, replace the oil with water. This dough will be harder to work with but will make a slightly firmer pizza crust.

Toppings

IMO, toppings come in four categories. You can mix and match, but the overriding rule is not to go overboard on any one topping. Remember, the more you add, the longer it is going to take to fully cook your pizza. For a 12″ pizza you shouldn’t have more than a cup of toppings (cheese exluded), moving up to a one and a half cups for a 16″ pizza.

  • Cheese – Whole milk mozzarella is the standard for pizzas, and for a good reason. It has a mellow yet rich taste and melts into a single layer of cheesy goodness. Other cheeses can add flavor, such as cheddar, parmesan, provolone, feta, or goat cheese, but mozzarella should be at least half of the cheese that you use.
  • Meat – The ideal types of meat add a lot of flavor with just a little bit of actual meat, which is why sausages and cured meats are so popular. If you are a big fan of pepperoni, try out hot sopressata if you can find it. You will be pleasantly surprised. And for the love of god, don’t forget to cook your meat ahead of time!
  • Veggies – Vegetables are great on pizza! Broccoli, onions, mushrooms, olives, spinach, sweet potatoes; the possibilities are nearly endless! Just remember to saute or blanch those ingredients you don’t want to eat raw (broccoli, I am looking at you), as well as tuck anything under the cheese that you think might burn under direct heat (my spinach!).
  • Garlic – This is just delicious. How can you not want to add some to your pizza? Even a little bit can add a lot of flavor. You can even roast it ahead of time if you are concerned about it being too pungent.

Gear

Wow. I could say a lot about cooking gear but I will keep this short and specific to pizzas. When I make pizza, I use a stand mixer and a peel. You don’t have to use both but it will make it easier. In place of a stand mixer you can use a bowl and spoon, just be prepared to mix and kneed until your arm is dead. You can replace a peal with the underside of a sheet pan. This works well but can be awkward to handle.

The one thing I wouldn’t skip out on is a pizza stone. They help significantly in making your pizza light and fluffy rather than thin and cracker-like. If you can’t get one, use the underside of a cast iron skillet. If you can’t get a cast iron skillet, you are dead to me.

Steps

  1. Mix flour, yeast and salt in a mixing bowl
  2. Dissolve syrup in the water
  3. Mix the water and oil as quickly as possible with the flour
  4. Kneed for about 8-10 minutes
  5. Roll into a ball. Instructions on how to do this critical step can be found on the internet.
  6. Let rise in a lightly oiled and covered bowl either for 1-2 hours on the counter or overnight in the fridge
  7. Heat up your oven to 500° or however comfortable you feel like heating up your pizza stone
  8. Roll out with the technique of your choice.
  9. Flour your moving device of choice so that dough doesn’t stick
  10. Move the dough onto the device
  11. Pinch the top of the dough in and the bottom out, forming a heart(ish) shape
  12. Top. Mmm, toppings.
  13. Carefully slide the pizza onto the stone
  14. Cook for about 8-12 minutes, or until everything is melted, the cheese is brown and you are really, really hungry just staring at it
  15. Using a spatula and pan, or a peel, carefully remove the pizza from the stone and onto a cutting board
  16. Cut
  17. Revel in the eternal love of your significant other(s).
  18. Share if needed.

And now, the pizza porn pics!


Dough, post rise, with toppings

Made with knives!

Adorable Pepperoni Hearts. D'awwwwww!

Yup, that's dough

Pre-cooked love pizza

Post-cooking. Mmmmmmmm.

I am hungry just looking at this.

The bottom turned out nice and toasty!

So the pumpkin soup turned out amazing! The taste and body were great, and the suggestions from friends that both added a lot to the finished product. It was the perfect thing on this rainy sunny day. WTF October.

Pumpkin Soup

Ingredients
1 29oz can of pumpkin (or a 4-5 pound pumpkin that you have gutted, scraped, and roasted you crazy person you)
2 tbsp butter
2 medium red onions, diced
6 C chicken stock
1 tsp ground cinnamon
1/2 tsp ground nutmeg
1 tsp cayenne
1 C heavy cream
2 tbsp maple syrup

Procedure
1. Make the croutons now. Its just easier this way.
2. Melt butter in pot. You could use the one that the girlfriend’s father got you, but you don’t have to.
3. Add onions and cook until properly sweated.
4. Add stock, pumpkin, cinnamon, nutmeg, and cayenne. Stir. Stir some more.
5. Simmer for about 15. Now is a good time to make the pecans. Make a double batch actually, in case you eat some.
6. Remove Dutch oven from heat. Puree soup with immersion blender or in regular blender if you are a crazy person.
7. Stir in cream and maple syrup, and taste for salt and pepper.
8. Take pictures and preen for the internet. Oh, and enjoy.

Candied Curried Pecans

Ingredients
1 C pecans
2-3 tbsp curry powder
1/2 C simpe syrup

Procedures
1. Cut up your pecans as small as you like them
2. heat up a non-stick pan over medium heat, or else you are never going to be able to clean this
3. Add the pecans and simple syrup.
4. When the syrup starts to bubble, add the curry powder and mix it up.
5. Wait.
6. wait for it…
7. OK, now when the sypup starts to look thick and starts to solidify on your spoon, kill the heat and stir
8. Now get back to your soup!

Cinnamon Croutons

Ingredients
4 slices of bread
Lots of cinnamon
3 tbsp oil

Procedure
1. Toast your bread to about medium toastiness
2. Heat up your oil in a large pan
3. Cut up your toast into whatever sizes you what for croutons.
4. Fry the pieces up a bit in the oil for about 2-3 minutes
5. When most of the oil is out of the pan, move all of the pieces together and coat in cinnamon
6. Heat for another minute or two than move them off the heat to rest of a bit before food.

NOW EAT.

I find it oddly delightful that the first thing I am posting to this new “Food Porn” group isn’t actually a new recipe, but a sequel. About three months ago  +Shayna Ingram asked me to make some Toffee Macadamia Nut Cookies (http://couponclippingcook.com/blog/macadamia-nut-toffee-coffee-cookies) with some espresso added in as a counter note. I was happy to comply.

They were terrible.

They were loose, crumbly cookies there actually dried out your mouth when you ate them. Additionally all of the chopping, rolling, and cooking required for the macadamia nuts actually made me feel nauseated. I had to leave the kitchen while they were cooling, and smell managed to linger for days afterwords. They were not a complete loss though. As Shayna pointed out they were good served with ice cream. Oh fat and sugar, is there nothing you can’t solve?

Needless to say I was when Shayna asked me to make toffee cookies again I was a bit flummoxed. I like the idea of toffee in a cookie, with its sharp and cleanly sweet taste, but my implementation so far left a lot to be desired. So I decided to solve the problem with a liberal application of butter.

I went with modifying an old standby with the wonderful results you see below. This recipe started off as a Tollhouse chocolate chip cookie recipe. I took the standard recipe, replaced the white sugar with more brown sugar for a wider depth of flavor, doubled the vanilla for the same reason, and added a tablespoon of espresso ground coffee beans for a nice kick. Finally I replaced the bag of chocolate chips with Heath bar baking bits. Also, no nuts because, ew, seriously? When making it my butter was frozen but it wasn’t anything a stand mixer couldn’t handle.

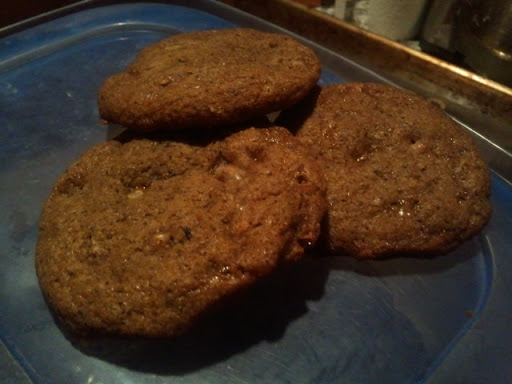
I couldn’t be happier with the results. They turned out just amazing. The cookies were soft and moist (THANK GOD).They also had a subtle yet deep toffee flavor that I was really surprised by as they were just loaded with sugar. There was not overly sweet burst of sugar with these cookies, just a slow rich build up of sweetness and richness starting with the faint coffee and toffee flavors and melting into a rich tasty treat.

TL:DR Fucking make these already.

Ingredients
2 1/4 cups all-purpose flour
1 teaspoon baking soda
1 teaspoon salt
1 cup (2 sticks) butter, softened
1 1/2 cup packed brown sugar
2 teaspoon vanilla extract
2 large eggs
1 bag (10.2-oz. pkg.) Heath Bar Toffee Baking Bits
1 tablespoon espresso ground coffee beans

Directions
1. Cream sugar and butter until delicious. Mix in eggs and vanilla and try some. Laugh in the face of salmonella.
2. Shift together the dry ingredients, or just do what everybody actually does and mix them in a bowl, add to the tasty wet ingredients. Try some more. Smile.
3. Add in the espresso bits. Try not to mainline this step as it will not make the cookies finish any faster.
4. Add the toffee bits. Try and have a vague idea of where this is going.
5. Cover with plastic wrap and refrigerate overnight to 1-2 days.
5a. Seriously, don’t freaking take it out yet. You will get a more complex favor this way.
6. Preheat oven to 375° F, or to paraphrase +Hannah Hart, heat your shit.
7. Bake for 9 to 11 minutes or until slightly past golden brown. They are naturally darker than those chocolate chip cookies, so deal with it.
8. Cool on the pan for a minute or two the move to cool them on a rack. Warning: They will be molten and trying to cool into something looking like tan glass wrapped in a cookie. This is natural and delicious.

And now, the food porn.
The rest of the album can be found here.